Preparation: Checking the disc and PPE
Proper preparation is 50% of safe work. Follow these steps before each cutting session:
Ring Test — checking the integrity of the ring
Before installing a new wheel, perform an acoustic check:
- Hold the wheel by the mounting hole (not the edge)
- Lightly tap the side surface with a wooden object (pencil, hammer handle)
- Clean, ringing sound— the disc is complete, you can use it
- A dull or rattling sound means there is a crack, the wheel needs to be disposed of.
Installing the protective cover
The protective cover is a mandatory safety feature. It must cover at least 180° of the disc (half) and be directed away from the operator. Before work, make sure that the cover is securely fixed and does not rotate.
Personal protective equipment (PPE)
| PPE | Standard | What does it protect against? |
|---|---|---|
| Safety glasses | EN 166 | Sparks, debris, abrasive dust |
| Gloves | EN 388 | Hot metal, sparks, cuts, vibration |
| Respirator | EN 149 (FFP2+) | Metal and abrasive dust |
| Headphones or earplugs | EN 352 | Noise (>85 dB when cutting) |
| Protective apron or tight clothing | — | Sparks, hot debris (no synthetics!) |
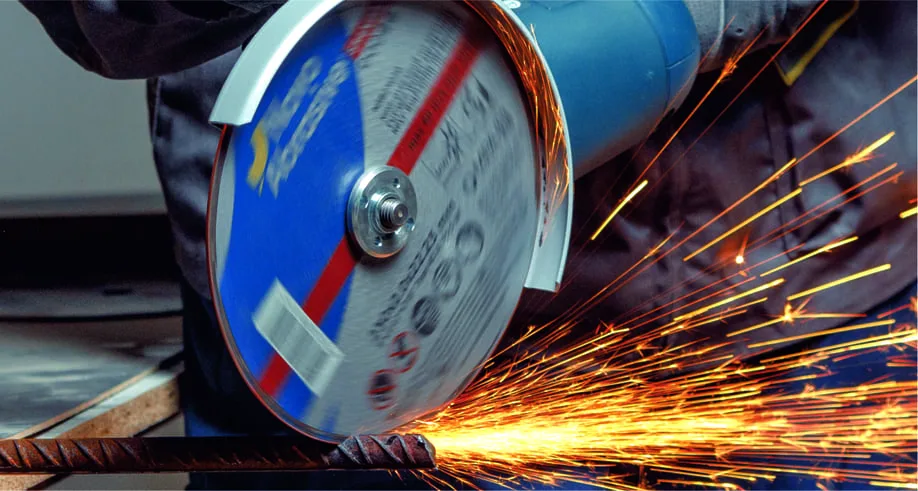
Correct cutting angle
A Cutting disc is a thin disc 1.0–3.0 mm thick, designed to withstand loads strictly in the plane of rotation. The correct angle of entry into the metal is critical for safety and cut quality.
- 90° to the surface— the Cutting disc must enter the metal strictly perpendicularly. This is its design operating mode.
- No lateral tilt - even a slight tilt creates lateral stress on the thin disc, which can lead to its destruction.
- For a smooth cut, hold the grinder steady with both hands. Do not change the angle while cutting.
Feed speed: smooth, without pressure
The most common mistake beginners make is to press down on the grinder, trying to speed up the cut. This is wrong and dangerous. The Abrasive disc cuts due to the speed of rotation, not pressure.
How to serve correctly
- Let the disc cut on its own - plunge the disc into the metal under the weight of the tool with a light guiding force
- Smooth movement - no jerks, no stops in the cutting area
- Listen to the sound - a steady high tone means the load is correct. A drop in tone means overload, reduce the feed.
- Watch for sparks - a steady stream of sparks down. If sparks fly erratically - something is wrong
Signs of misfeeds
| Symptom | Cause | What to do |
|---|---|---|
| The engine is humming, the rpms are dropping | Too much pressure | Reduce the feed, let the disk spin up |
| The metal turns blue in the cut area. | Overheating due to slow feed or dull wheel | Increase feed or replace wheel |
| The disc vibrates, beats | Uneven cut or wheel defect | Check the disc, align the cutting line |
| The wheel wears out quickly | Wrong type or excessive pressure | Check the material disc for compliance |
Equipment for different profiles
Different types of workpieces require different approaches. Here are proven techniques for the most common tasks:
Pipes (circular cross-section)
- Secure the pipe in a vice or clamp. The pipe should NOT twist.
- Make a mark with a marker around the entire perimeter of the pipe.
- Start the cut from the top point, plunging the disc to the depth of the wall.
- Turn the pipe 90° and continue the cut on the next side.
- Repeat two more times, completing the circle.
Sheet metal
- Place the sheet on a stable stand so that both parts have support.
- Place the cutting line over the void (gap for the disc)
- Use a thin 1.0–1.2 mm wheel for minimal heating and deformation
- Guide the grinder exactly along the marking line, without stopping.
- When cutting thin sheet (
Reinforcement
- Fix the reinforcement so that the cut point hangs from the support (the cut part will fall freely)
- Never cut rebar lying on the ground - the blade may scratch the surface.
- For reinforcement up to 12 mm, a 125×1.0 mm disc is sufficient.
- For 14–20 mm rebar, use a 125×1.6 or 125×2.0 mm wheel
Profile pipe (square, rectangle)
- Fix the profile and make markings on all four sides
- Cut each wall separately by rotating the profile
- Be especially careful with the last wall - the workpiece may shift.
Cooling during serial cutting
When cutting in series (10+ workpieces in a row), the workpieces and the disc heat up. Overheating reduces the life of the disc and can deform the workpiece.
- Take breaks - after every 5-7 cuts, let the disc cool for 1-2 minutes
- Do not cool with water - sudden temperature changes may cause a crack in the Bakelite bond. Air cooling only
- Alternate rounds - for large volumes, hold 2–3 rounds and alternate them, letting each one cool
- Use Extreme series wheels - ceramic grain cuts cooler, heats the workpiece less and maintains performance longer
Typical technique errors
- Lateral load on the Cutting disc. Using a thin Cutting disc for grinding or widening a slot. A thin wheel cannot withstand lateral forces - it is designed only for cutting in the plane of rotation.
- Jamming of the disc in the workpiece. Occurs when both parts of the workpiece compress the disc (incorrect location of the supports). The result is a sharp jerk of the grinder from the hands. Solution: the cut-off part should separate freely.
- Cutting "towards yourself". The direction of the cut is always FROM the operator. If the disc jams, the grinder will jump out in the direction of the cut. If this direction is towards you, the consequences can be serious.
- Working without a protective cover. The cover is removed for "convenience" or to install a larger diameter disc. When a disc breaks at 12,000 RPM, fragments fly at speeds of up to 80 m/s - deadly.
- Excessive pressure on the grinder. Pressure overloads the motor, overheats the disc and workpiece, and accelerates wear. The Abrasive disc works by speed, not by pressure.
- Cutting in a loose workpiece. The workpiece may shift, pinch the blade, or fly out. Always secure the metal with a vice, clamp, or other holding device.
30-second test before work
After installing a new wheel or before starting each shift, perform the mandatory safety test:
- Install the wheel - make sure the flanges are tightened correctly, the wheel does not wobble
- Install the protective cover - point the open part away from you
- Move away from people - make sure there are no strangers in the area of the disc's rotation
- Turn on the grinder - hold it so that the plane of the wheel is not directed towards you
- Wait 30 seconds at full speed without load
- Listen - a smooth sound without beating and vibrations means that the wheel is normal.
Frequently asked questions
At what angle should you hold the grinder when cutting metal?
The Cutting disc should enter the metal at a 90° angle to the surface— strictly perpendicular. Tilting the wheel to the side creates a lateral load that a thin Cutting disc is not designed to handle. Lateral load can cause the wheel to bind or break.
Why can't you put pressure on the grinder when cutting?
Excessive pressure overloads the motor, overheats the disc and workpiece, and accelerates wheel wear. The abrasive wheel works by speed, not pressure. The feed should be smooth — let the disc cut on its own. Correct feed: the disc sinks into the metal under the weight of the tool with a slight guiding force.
How to properly cut pipes with a grinder?
Secure the pipe in a vice or clamp. Mark around the entire pipe with a marker. Start cutting at the top point. Rotate the pipe 90° and continue cutting on the next side. Do not try to cut through the wall from one side - this increases the risk of the blade binding.
What is a Ring Test and why is it performed?
Ring Test — check the integrity of the abrasive wheel before use. Hold the wheel by the mounting hole and lightly tap the side surface with a wooden object. The entire wheel makes a clear ringing sound. A dull sound or rattling indicates a crack — such a wheel should be disposed of. For more information on safety, see our safety page.
How long do you need to rotate the grinder before work?
After installing a new wheel or before starting a change, be sure to run the grinder at idle for at least 30 seconds. Hold the tool so that the wheel is not pointed at you or other people. This allows you to detect imbalance, runout or hidden defects in the wheel before you start working.
Choose the right cutting wheels
A quality wheel is the foundation for safe and productive work. View the NovoAbrasive Cutting disc catalog.